Comparison and Projection in SQLCompass
A Comparison is a type of snapshot which is created by comparing two existing snapshots and identifying differences in the database schemas.
The terms Left and Right are used to refer to each of the original snapshots:
- Left is generally the starting point for a transformation or source database
- Right should be considered as the desired state or target database
[vc_separator type=’transparent’ position=’center’ color=” thickness=’0′ up=’25’ down=’25’]
All objects from both snapshots will be present in the comparison snapshot and will be labelled with one of the following comparison states:
- Identical (exactly the same in both original snapshots)
- Similar (differing only in white-space or comments)
- Different (present but significantly changed in both original snapshots)
- Left (existing only in the left snapshot)
- Right (existing only in the right snapshot)
[vc_separator type=’transparent’ position=’center’ color=” thickness=’0′ up=’25’ down=’25’]
A Projection is a type of snapshot which is created by applying one or more SQL scripts to an existing snapshot and identifying what changes have been applied in the resulting database.
[vc_separator type=’transparent’ position=’center’ color=” thickness=’0′ up=’25’ down=’25’]
Resulting objects in the projection snapshot will be labelled with one of the following comparison states:
- Identical (unaffected by any script)
- Changed (present in the original snapshot but changed by one or more scripts)
- Added (not present in the original snapshot but created by one or more scripts)
- Dropped (present in the original snapshot but dropped by one or more scripts)
[vc_separator type=’transparent’ position=’center’ color=” thickness=’0′ up=’25’ down=’25’]
In this article we’ll start by building a projection and then use this projection to build a comparison
[vc_separator type=’transparent’ position=’center’ color=” thickness=’0′ up=’25’ down=’25’]
Projection in SQLCompass
[vc_separator type=’transparent’ position=’center’ color=” thickness=’0′ up=’25’ down=’25’]
1) Type the following into a SQL script file called “changes.sql”:
[vc_separator type=’transparent’ position=’center’ color=” thickness=’0′ up=’25’ down=’25’]
CREATE TABLE [dbo].[NewTable] (
[ID] INT IDENTITY(1, 1) NOT NULL PRIMARY KEY,
[Value] DECIMAL(18, 4),
[Name] VARCHAR(10) DEFAULT ('DAVE')
)
GO

ALTER TABLE [Person].[Person] ALTER COLUMN [Title] NVARCHAR(12) NULL
GO
[vc_separator type=’transparent’ position=’center’ color=” thickness=’0′ up=’25’ down=’25’]
2) From the quick access menu ![]() click New Document
click New Document ![]()
[vc_separator type=’transparent’ position=’center’ color=” thickness=’0′ up=’25’ down=’25’]
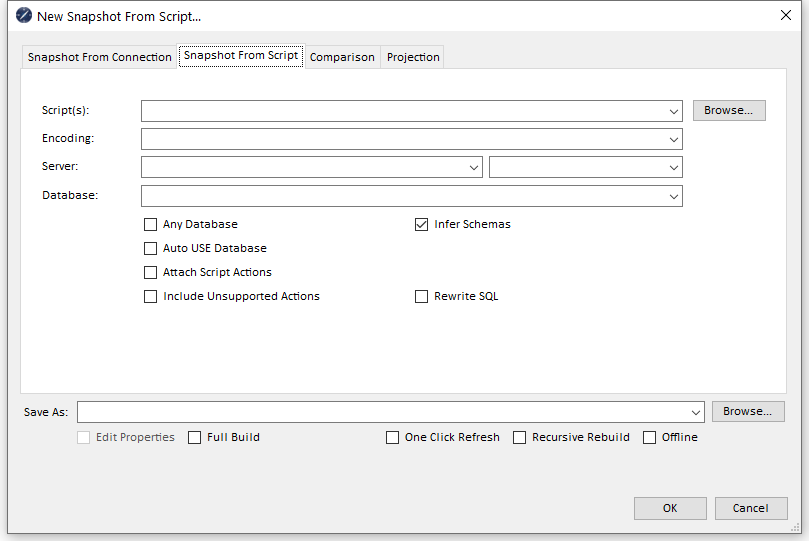
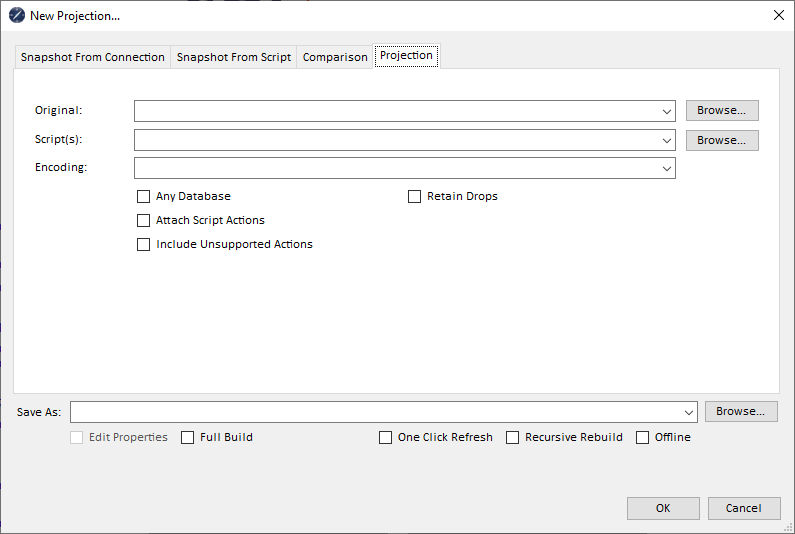
3) Ensure the fourth tab (Projection) is selected
[vc_separator type=’transparent’ position=’center’ color=” thickness=’0′ up=’25’ down=’25’]
[vc_separator type=’transparent’ position=’center’ color=” thickness=’0′ up=’25’ down=’25’]
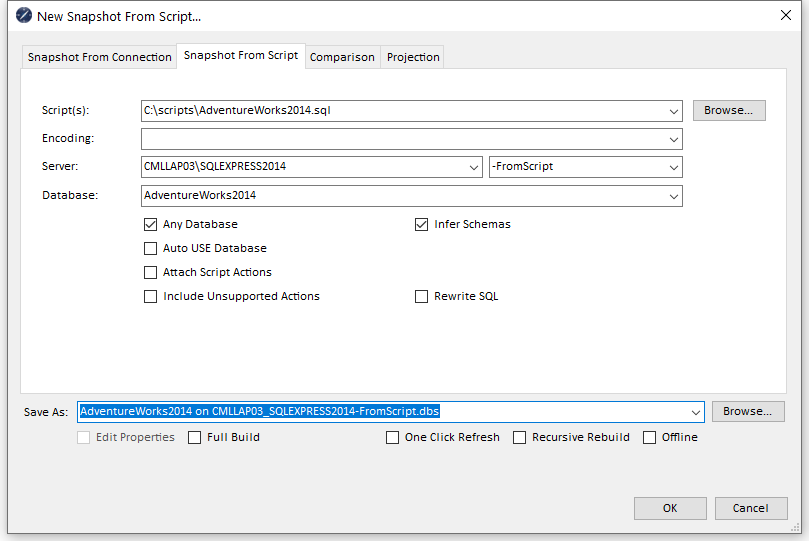
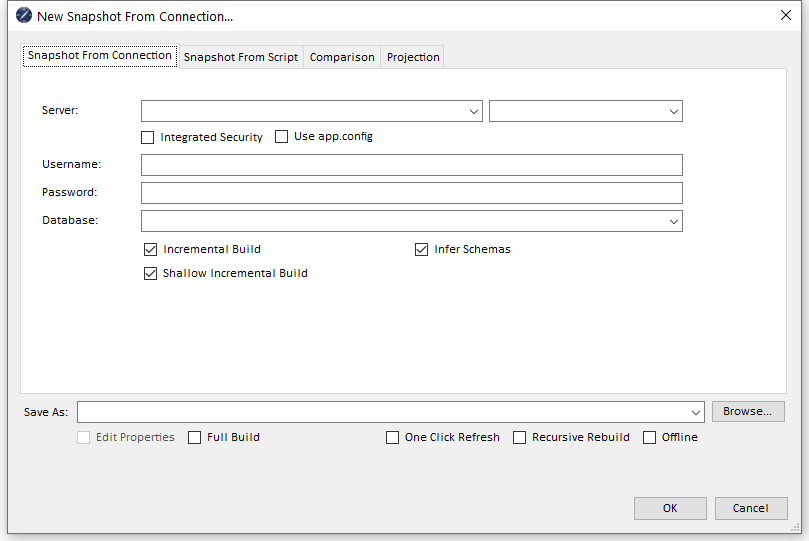
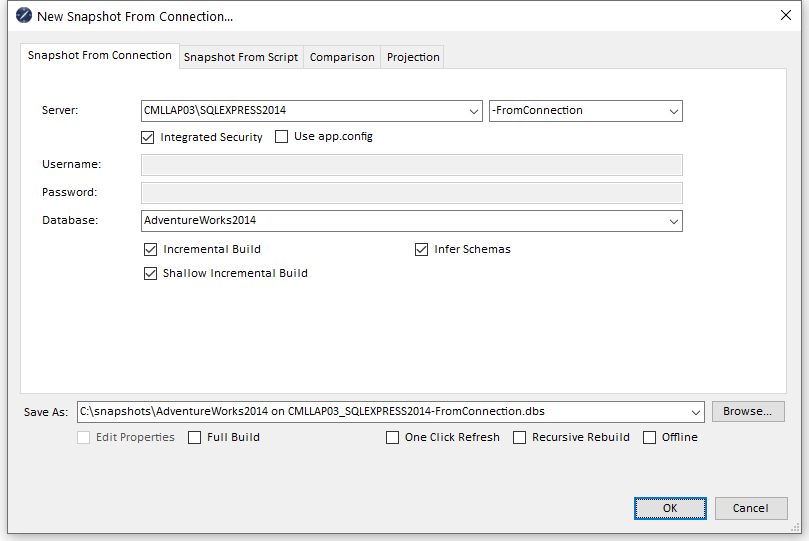
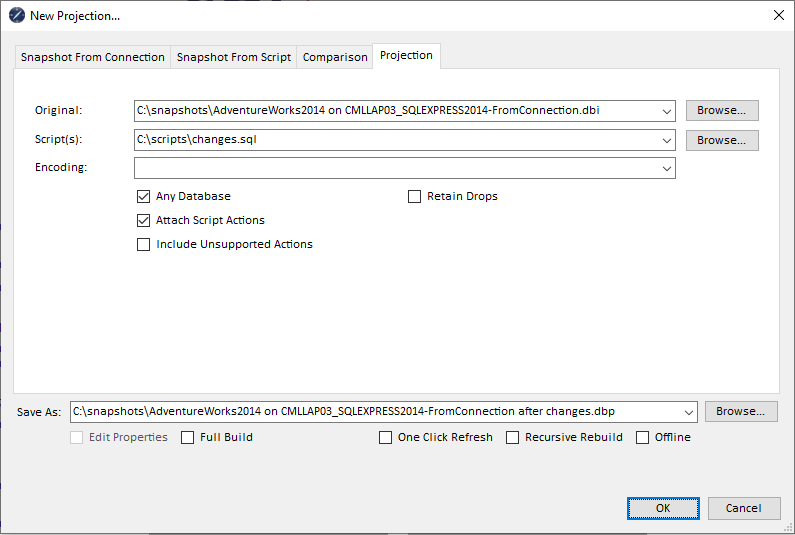
4) In the Original dropdown, select an AdventureWorks snapshot created from a database connection or script (or use the Browse button to locate the file)
[vc_separator type=’transparent’ position=’center’ color=” thickness=’0′ up=’25’ down=’25’]
5) In the Script(s) dropdown enter the full path to the changes.sql file (or use the Browse button to locate the file)
[vc_separator type=’transparent’ position=’center’ color=” thickness=’0′ up=’25’ down=’25’]
6) Check the Any Database and Attach Script Actions checkboxes
[vc_separator type=’transparent’ position=’center’ color=” thickness=’0′ up=’25’ down=’25’]
7) Select a filename suggestion from the Save As dropdown (or type a filename if you prefer) and Click OK (You may be prompted for a folder location if none has been specified)
[vc_separator type=’transparent’ position=’center’ color=” thickness=’0′ up=’25’ down=’25’]
[vc_separator type=’transparent’ position=’center’ color=” thickness=’0′ up=’25’ down=’25’]
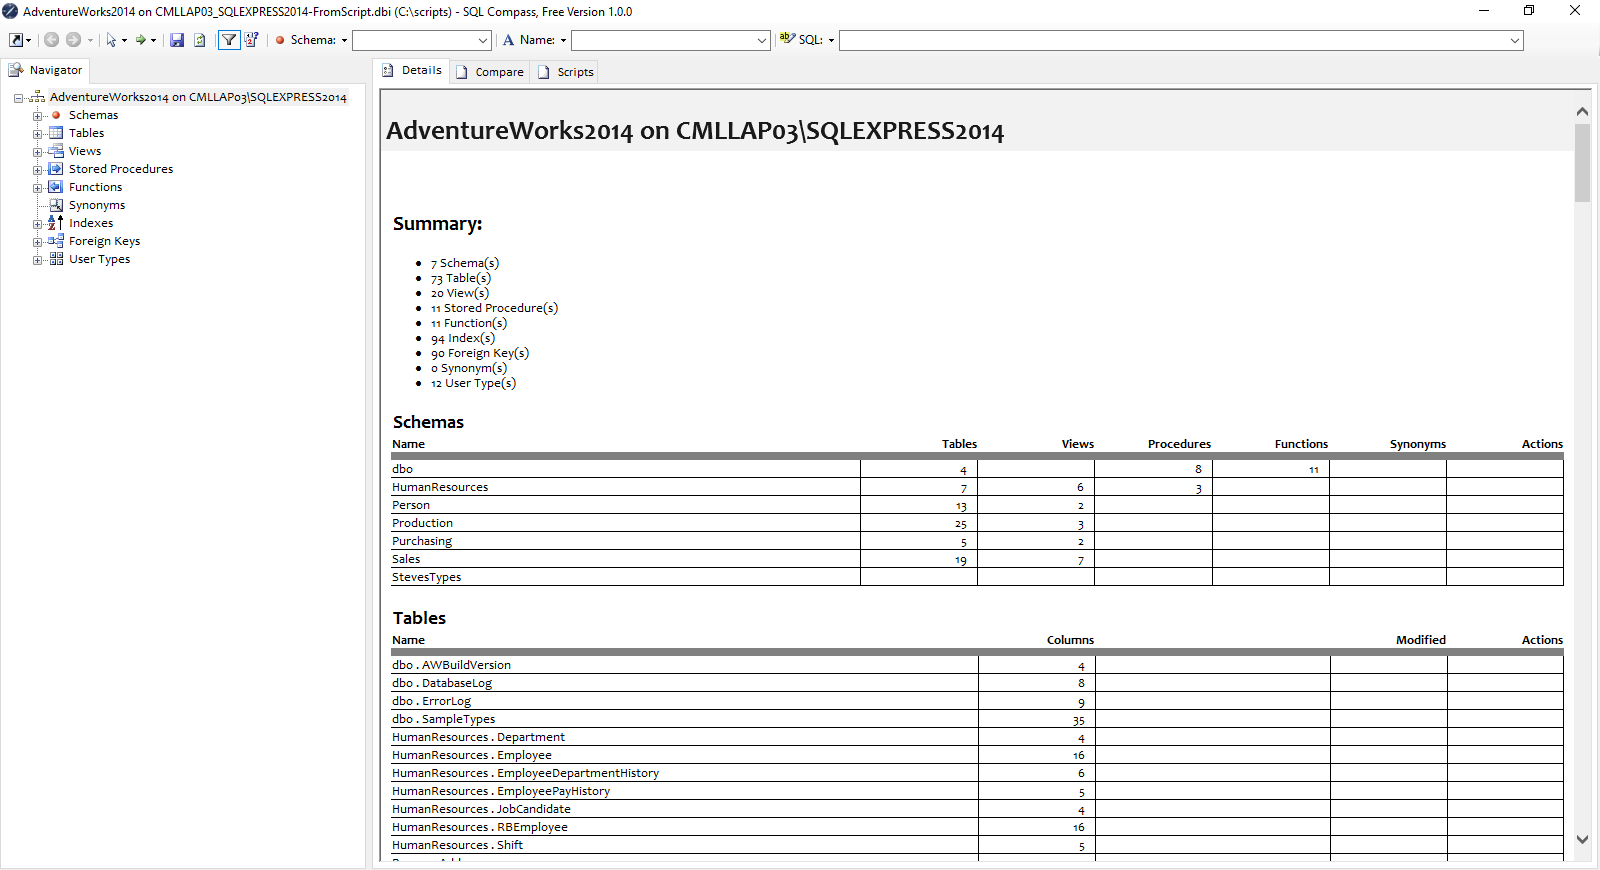
The new snapshot will be created by applying the SQL script to the original snapshot, tracking changes to database objects
No changes will be made to the original snapshot or to the underlying database from which it was build
The projection snapshot can be thought of as a virtual database which would be the result of applying the changes.sql script to the AdventureWorks database
[vc_separator type=’transparent’ position=’center’ color=” thickness=’0′ up=’25’ down=’25’]
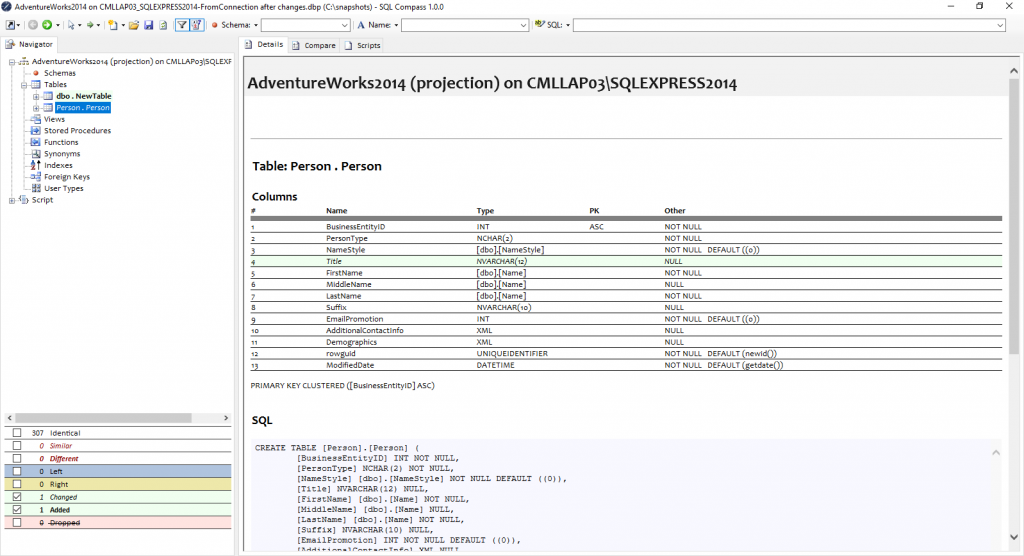
8) Now you have the projection on screen, activate the State Filter by clicking ![]()
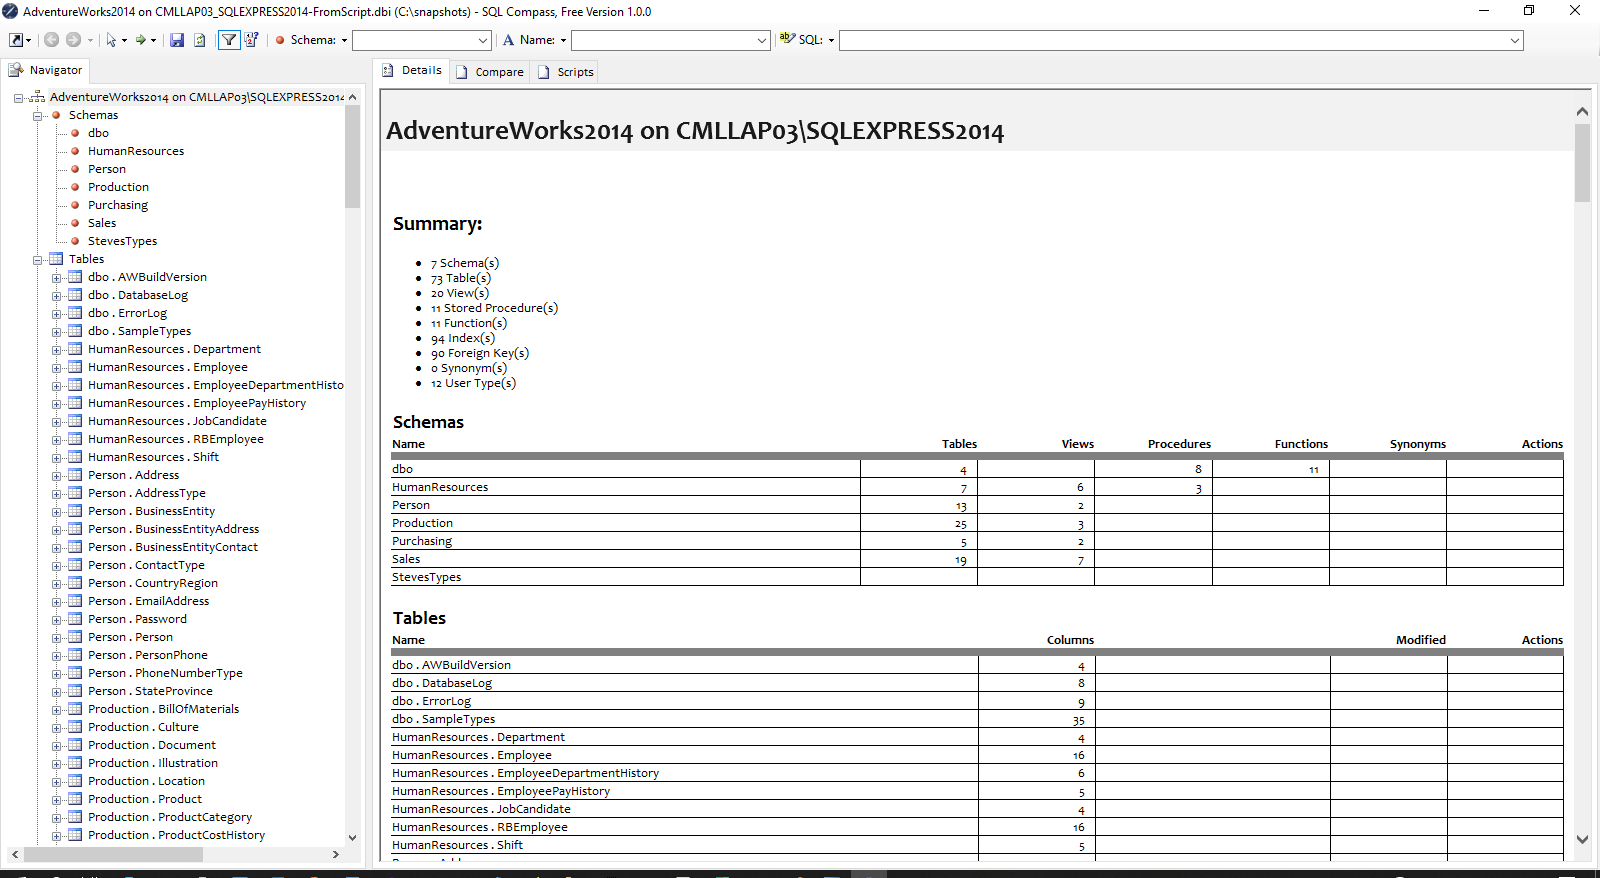
You’ll see that the projection has changed 1 object and added 1 object while leaving 307 objects unchanged (identical)
Place a check mark against the Changed and Added items and you’ll see than dbo . NewTable has been added and Person . Person has been changed
[vc_separator type=’transparent’ position=’center’ color=” thickness=’0′ up=’25’ down=’25’]
[vc_separator type=’transparent’ position=’center’ color=” thickness=’0′ up=’25’ down=’25’]
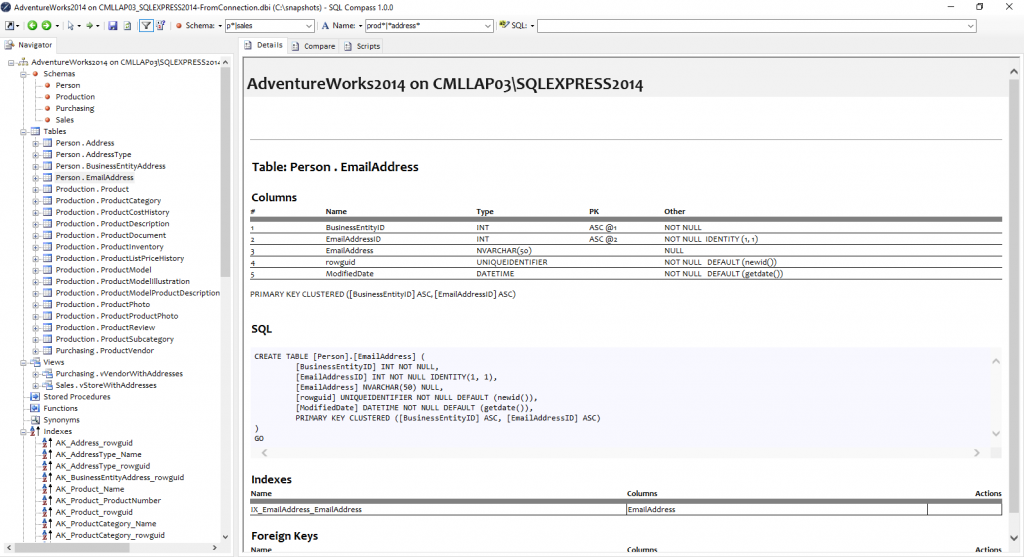
Further details of how these items have changed can be accessed in the Details pane by clicking on these tables in the tree view or summary screen:
[vc_separator type=’transparent’ position=’center’ color=” thickness=’0′ up=’25’ down=’25’]

[vc_separator type=’transparent’ position=’center’ color=” thickness=’0′ up=’25’ down=’25’]
You’ll also notice that by scrolling down in the Details pane you can see exactly which script fragments affected these objects
So, lets drill down into those projection options a little deeper:
[vc_separator type=’transparent’ position=’center’ color=” thickness=’0′ up=’25’ down=’25’]
Original
- Should contain the full path to the original snapshot which will be used as a starting point for the projection
[vc_separator type=’transparent’ position=’center’ color=” thickness=’0′ up=’25’ down=’25’]
Script(s)
- Enter the path to a file or files containing the script(s) to be applied to the original snapshot. ‘#’ may be used as a wildcard to match all files in a folder (similar to ‘*’ in general use) and ‘##’ may be used to match all files in a folder or subfolder.
[vc_separator type=’transparent’ position=’center’ color=” thickness=’0′ up=’25’ down=’25’]
Encoding
- Specifies the encoding which was used when generating the script . If left blank then a default encoding of Windows-1252 (CP-1252) will be used which generally works in most cases. You may need to specify a different encoding if characters are displayed incorrectly in your snapshot
[vc_separator type=’transparent’ position=’center’ color=” thickness=’0′ up=’25’ down=’25’]
Any Database
- When checked, all script fragments will be parsed and will contribute to the snapshot
- When unchecked, script fragments will only be processed where preceded by a USE statement which matches the database name specified
- This allows scripts referencing multiple databases to be properly processed against multiple snapshots if required
[vc_separator type=’transparent’ position=’center’ color=” thickness=’0′ up=’25’ down=’25’]
Attach Script Actions
- When checked, a collection of all parsed script actions contributing to the snapshot is retained as part of the snapshot
- As a result, all the actions leading to a change in an object can be listed against that object (e.g. a table which has been created through a CREATE TABLE fragment followed by several ALTER TABLE fragments in the processed script(s) which will detail the exact fragments alongside the final table structure)
[vc_separator type=’transparent’ position=’center’ color=” thickness=’0′ up=’25’ down=’25’]
Include Unsupported Actions
- Many script fragments are unrecognised by SQLCompass (e.g. SET ANSI NULLS…) and these unsupported actions will be ignored during parsing
- Checking this option will include these unsupported fragments in the attached script actions
- Generally it is recommended that this option be unchecked except where specifically required as it greatly increases the size of the snapshot
[vc_separator type=’transparent’ position=’center’ color=” thickness=’0′ up=’25’ down=’25’]
Retain Drops
- When checked, dropped objects will be retained in the projection and highlighted as dropped
- When unchecked, objects which are dropped as part of a projection will be removed from the snapshot
[vc_separator type=’transparent’ position=’center’ color=” thickness=’0′ up=’25’ down=’25’]
So now you’ve generated a projection you have something to compare to the original
[vc_separator type=’transparent’ position=’center’ color=” thickness=’0′ up=’25’ down=’25’]
Comparison Snapshot in SQLCompass
[vc_separator type=’transparent’ position=’center’ color=” thickness=’0′ up=’25’ down=’25’]
To create a Comparison snapshot follow these steps…
[vc_separator type=’transparent’ position=’center’ color=” thickness=’0′ up=’25’ down=’25’]
1) From the quick access menu ![]() click New Document
click New Document ![]()
[vc_separator type=’transparent’ position=’center’ color=” thickness=’0′ up=’25’ down=’25’]
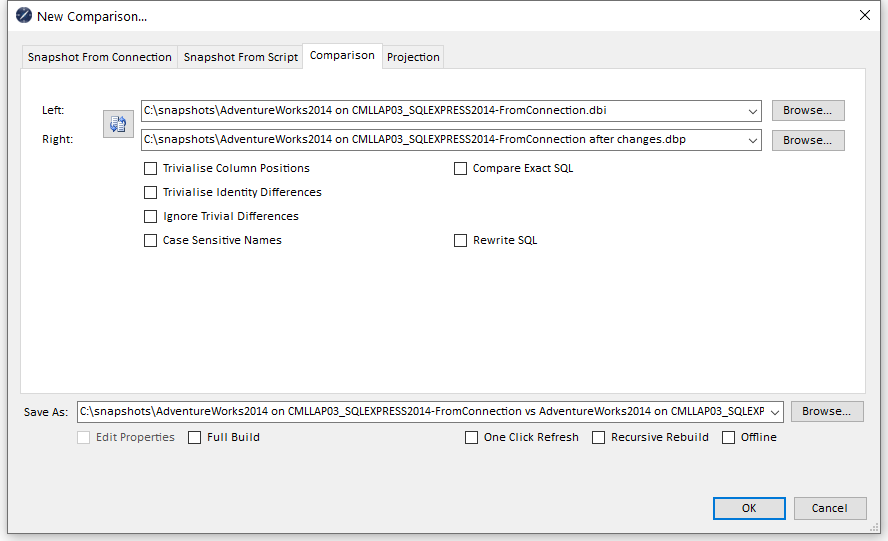
2) Ensure the third tab (Comparison) is selected
[vc_separator type=’transparent’ position=’center’ color=” thickness=’0′ up=’25’ down=’25’]
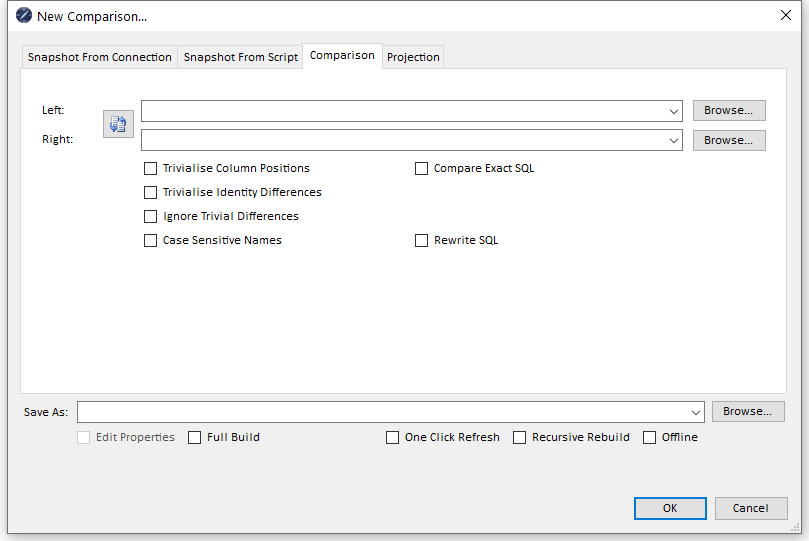
3) In the Left dropdown, select the original AdventureWorks snapshot used to build the projection (or use the Browse button to locate the file)
[vc_separator type=’transparent’ position=’center’ color=” thickness=’0′ up=’25’ down=’25’]
4) In the Right dropdown, select the projection snapshot (or use the Browse button to locate the file)
[vc_separator type=’transparent’ position=’center’ color=” thickness=’0′ up=’25’ down=’25’]
5) Leave all checkboxes unchecked
[vc_separator type=’transparent’ position=’center’ color=” thickness=’0′ up=’25’ down=’25’]
6) Select a filename suggestion from the Save As dropdown (or type a filename if you prefer) and Click OK (You may be prompted for a folder location if none has been specified)
[vc_separator type=’transparent’ position=’center’ color=” thickness=’0′ up=’25’ down=’25’]
The new snapshot will be created by comparing database objects in left and right snapshots and tracking any differences
[vc_separator type=’transparent’ position=’center’ color=” thickness=’0′ up=’25’ down=’25’]
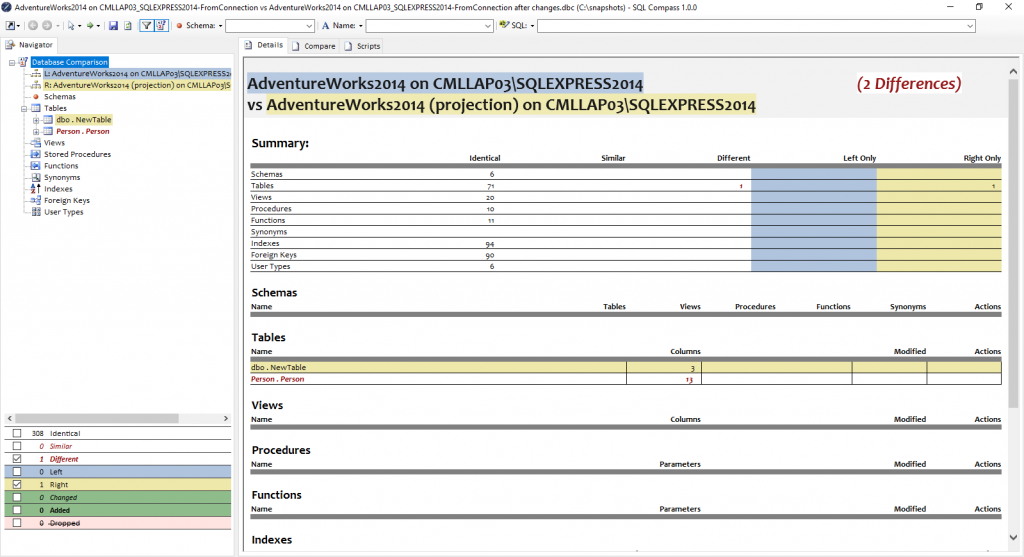
7) Now you have the comparison on screen, activate the State Filter by clicking ![]()
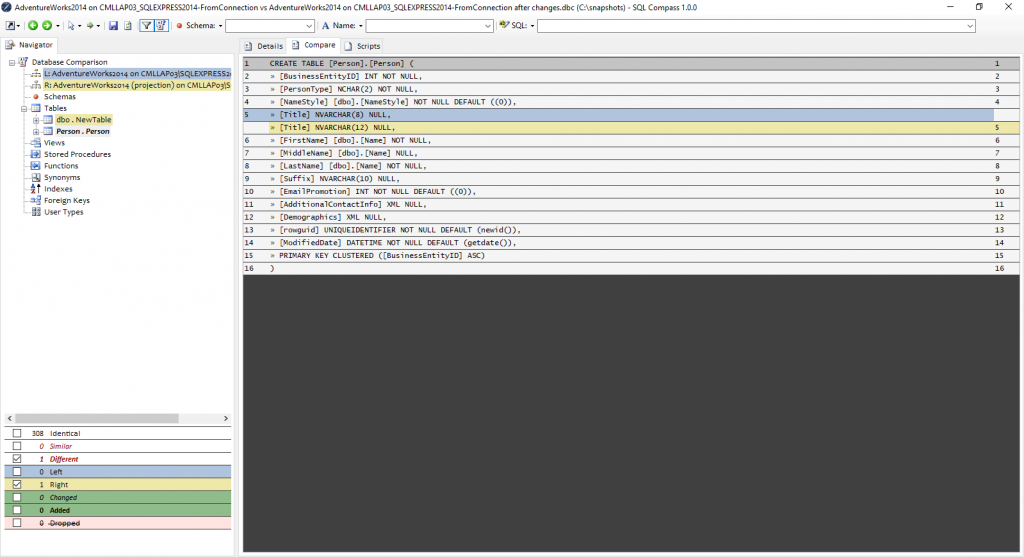
You’ll see that the comparison shows one difference and one right-only object while leaving 308 objects unchanged (identical)
Place a check mark against the Different and Right items and you’ll see that Person . Person is different and dbo . NewTable exists on the right only
[vc_separator type=’transparent’ position=’center’ color=” thickness=’0′ up=’25’ down=’25’]
[vc_separator type=’transparent’ position=’center’ color=” thickness=’0′ up=’25’ down=’25’]
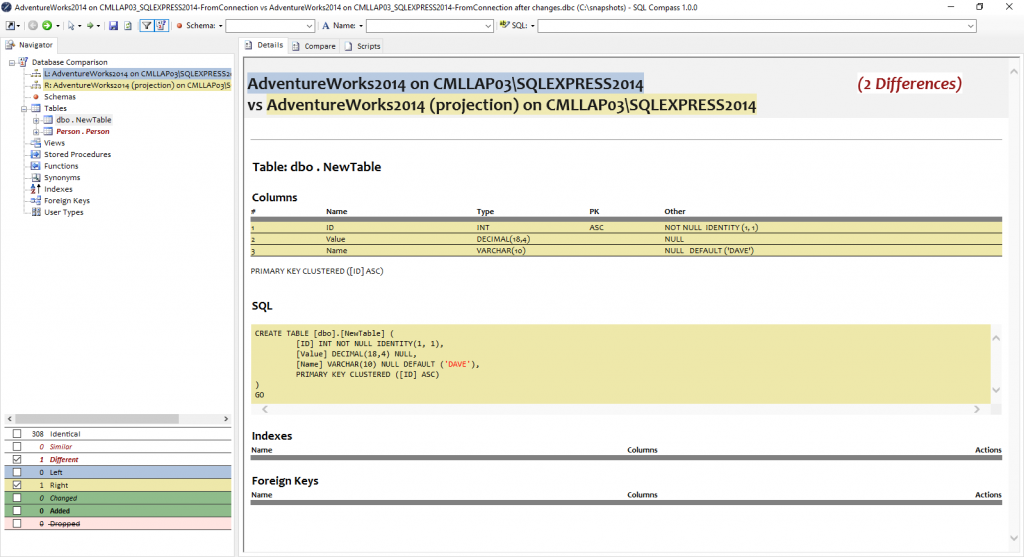
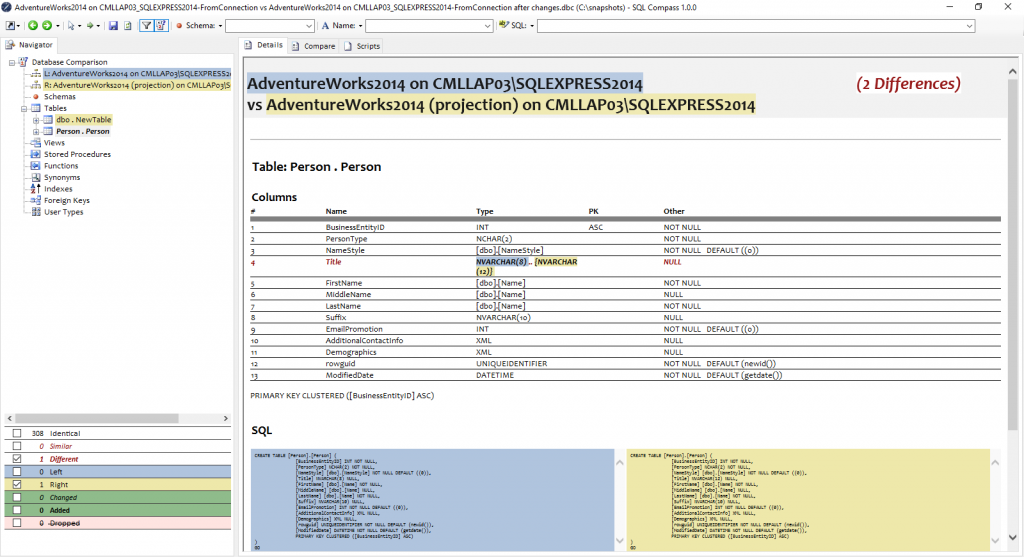
Further details of how these items have changed can be accessed in the Details pane by clicking on these tables in the tree view or summary screen:
[vc_separator type=’transparent’ position=’center’ color=” thickness=’0′ up=’25’ down=’25’]
[vc_separator type=’transparent’ position=’center’ color=” thickness=’0′ up=’25’ down=’25’]
[vc_separator type=’transparent’ position=’center’ color=” thickness=’0′ up=’25’ down=’25’]
You can also click on the Compare tab to get a better idea of how the SQL definition has changed:
[vc_separator type=’transparent’ position=’center’ color=” thickness=’0′ up=’25’ down=’25’]
[vc_separator type=’normalt’ position=’left’ color=’#03275a’ thickness=’1′ up=’10’ down=’10’]Just started working with or interested in learning about how SQL works? Click here.[vc_separator type=’normal’ position=’left’ color=’#03275A’ thickness=’1′ up=’10’ down=’10’]